
When we are editing a video and searching for the material that can be applied to make our content to be more fantastic, we may have the need to remove audio from video so that the soundtrack would not affect our editing video. For example, there are lots of video background provided on YouTube, and they are copyright-free for using personally. VideoHunter offers brilliant service save YouTube videos in high quality, but how can we remove the audios from them?
Today, there are two methods will be introduced to Windows 10 and Mac users. They don't need to download extra third-party tools, so it will be quite convenient for you. See how they work now!
CONTENT [For Windows 10] Remove Audio from Video with Video Editor[For Mac] 2 Easy Tricks to Mute Video[For Windows 10] Remove Audio from Video with Video Editor
Some people may not know that Windows 10 actually has a built-in video editor, which provides many helpful and simple-to-use functions for people to edit videos without hassle. You can click the Windows icon to awake the start menu of your Windows 10 computer, then from the list, you can find Video Editor easily.
NOTE: If you fails to find Video Editor on your Windows 10, enter Photos and you can also find it because Video Editor is also built into Photos app.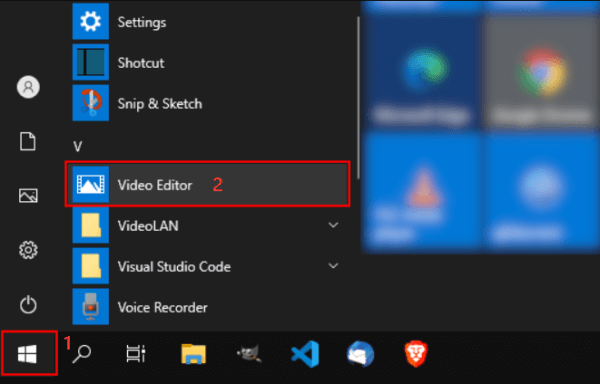
Now in the following tutorial, I will walk you through the process on how to remove track from video using this Video Editor on Windows 10.
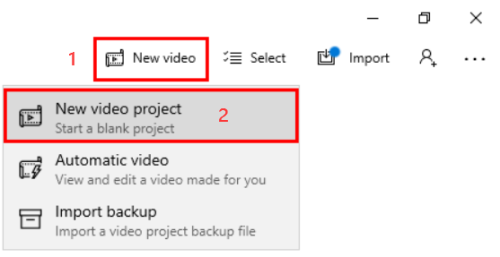
Step 1. After launching Video Editor, please press the New video project button in the middle. Then go to New video > New video project.
Step 2. Please name your video and click OK for creating this video project.
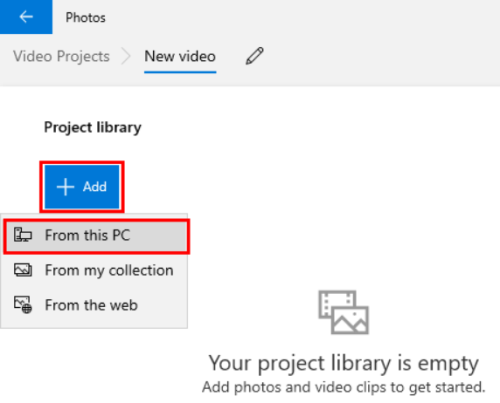
Step 3. Now in this new video project, you should add your local video file from PC to this interface. Just click on Add and then select From this PC option,subsequently, you can choose the video file for importing it to Video Editor.
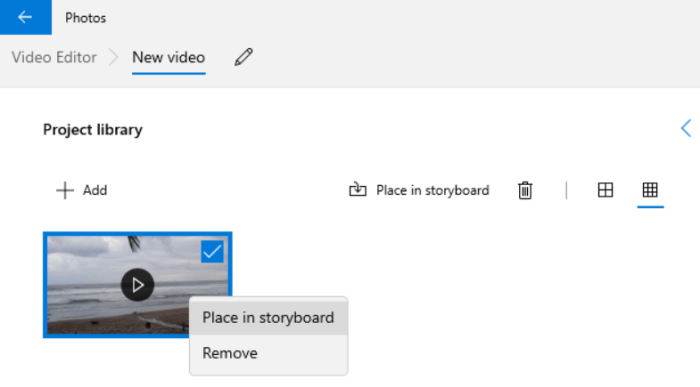
Step 4. After importing the video, right-click it and select Place in storyboard option.
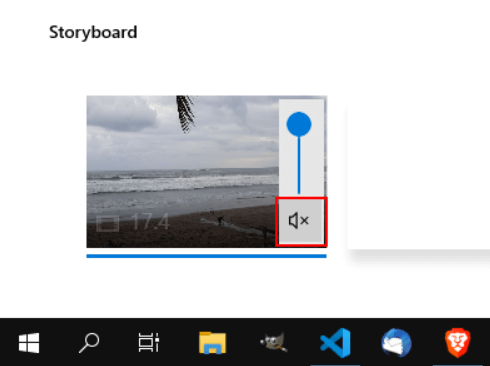
Step 5. Move to the Storyboard section in Video Editor and you can find the video you just added here. Notice that there is a audio icon in the lower right corner of the video cover, please click it for muting the sound.
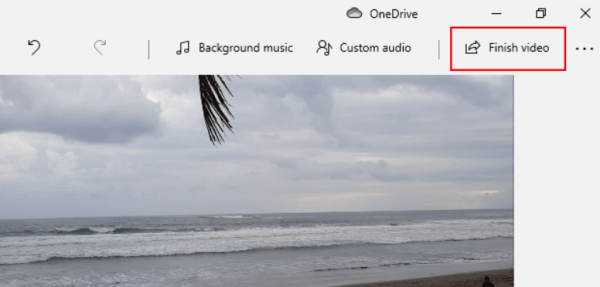
Step 6. Now when you have done editing this video by removing audio from it, move to the top right corner and submit Finish video for applying the change.
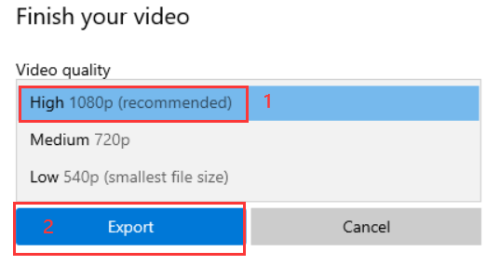
Step 7. Subsequently, in the pop-up window, select a video quality for saving this video-only file and click on Export.
Step 8. Then the Save As window will pop up for letting you to select a location to save the video, and rename it as you need. Eventually, by clicking Export in this window, you can get a soundless video on your PC!
[For Mac] 2 Easy Tricks to Mute Video
On Mac, you have two options to mute a video's soundtrack with the two helpful built-in software provided by macOS system. One is QuickTime Player, while the other is iMovie. In the following, I will show you the usage of them one-by-one.
# 1. Remove Audio from Video Using QuickTime Player
More than a single media player, QuickTime Player can also be used to do many other functions such as video recording and video editing. So actually, you can remove audio from video using this free application on Mac. Here are the steps you need to follow to mute a video in QuickTime Player.
Step 1. Use QuickTime Player to open the video which you want to remove audio from it.
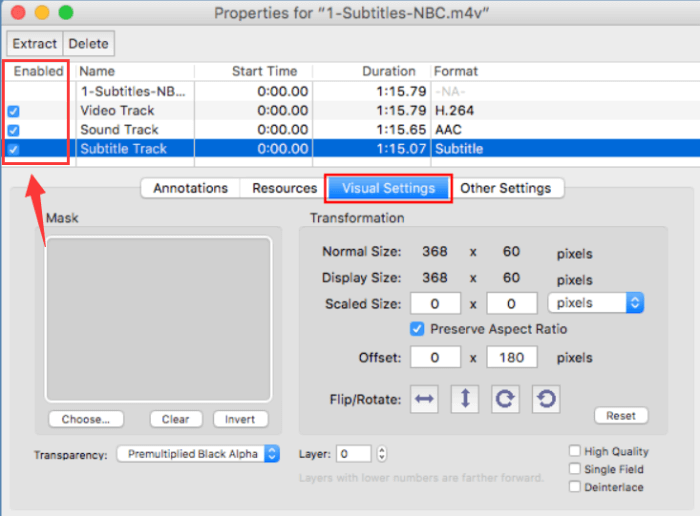
Step 2. Move to the top menu bar and go to Window > Show Movie Properties.
Step 3. In this part, just unselect the audio you don't need in this video in the Enabled section. Then QuickTime Player will directly remove the selected audio from this video.
# 2. Remove Audio Track from Video in iMovie Mac
iMovie is anothe powerful and professional built-in app for Mac users to create and edit videos without hassle. In this app, you can also remove sound from video very easily with the tutorial below.
Step 1. Run iMovie app on your Mac device, the go to Projects for creating a new video project inside iMovie.
Step 2. Subsequently, reach the video you want to remove audio from and drag it to the timeline in iMovie app.
Step 3. Now please right-click the video in timeline for detaching the audio from it by clicking on Detach Audio option.
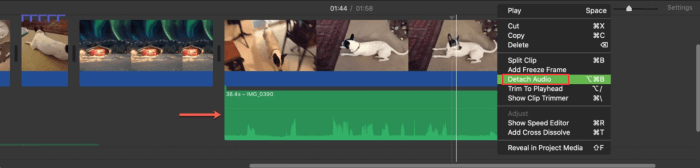
Step 4. After the audio is detached from the video, directly right-click for deleting the sound. Then just export the video-only file to your Mac device and you can get a soundless video file.
No matter you are using Windows or Mac, you can use their built-in video editors to remove audio from video if you need to. It won't be complicated to do this because all these functions are simple to use. Share this tutorial to your friends if you find it helpful!
videohunter
Top 1 Online Video Downloader